Wednesday, May 5, 2021

Installing drip irrigation: What I'd do next time

What a freaking headache.  Meh, I shouldn't say that.  You learn 3 times as much by failing first than by doing something correctly first.

I have delicate, newly planted bare-root trees all over the acre, and that made it especially hard to unroll the 3/4" irrigation hose and lay it out without whacking and damaging the new plants.  I mean, that 3/4" hose is not at all like a garden hose, so unrolling was a pain.  It kinks easily, and it's hard to fix the kink once established.  The attachments are super hard to get onto the 3/4" hose with my level of strength.  Also, pushing the 1/4" drip lines into holes I punched into the 3/4" hose killed my thumb tips!  They're so sore!  At one point, I had the wrong attachments (see the male to male connection I messed up on).


If I were to do this again with established plantings, I would unroll, in the sun, in an open space to get it stretched out and let the sun warm it up, and fix the kinks.  Then gently move it into place.

If I were to do this again with NO established plants that I cared about, then I would lay it out in one of
these patterns.


Hmm.  It just occurred to me that I might've found info similar to this online before I started.  Oh well.  I was in a hurry.

Also, I figured out (finally!) how to get a strong enough grip to shove attachments onto the 3/4" and the 1/4" drip line.  This potholder, which is actually useless for holding hot pots!  Actually, maybe my sister read the box wrong when she bought it for me, and it's actually one of those jar opener assist things.  Who knows!  I just wish I had thought of it when I spent days wrestling with wet hose and wet fingers.  Gah!


Alright, I've got 2 of the 4 major areas set up.  That took 3-4 days, so I guess I've got a lot of work left to do.  :)  I also want to get timers that will turn the water on automatically.  I often forget to turn the water off.  OMG!  I'm forgetting right now!  

I'm out in the garden now.  Wow, somebody's happy.  The ends of this noble fir were looking brown and dry until after the first watering.


In fact, there's a general sense of ease and joy coming from the acre now.  Like all the plants have breathed a sigh of relief.

Oh!  I forgot.  I'd also weedwhack where the hoses go, and then staple landscape fabric under it (ie, before laying the hose), about a foot or 18" wide.  That way the hose wouldn't disappear under greenery.  At least, not in the first couple years.  Maybe I'd put wood chips over the hoses for winter.

Saturday, May 1, 2021

Satellite images over time

I have a bunch of other short blog posts to make, but I just noticed that Google has updated the satellite view of our property, so I thought I'd do a little slide show of how things have changed.

First, here's a reminder of the plan for the empty acre.  (The remaining 1/4 acre has our house, and I have plans to leverage the microclimates caused by the heat-trap nature of our house and the shady north side, but those designs are more fluid.)

The basic plan:


The way I'll hope it looks.  :)


Satellite from 2016.  Nothing but weedy grass that had chemicals and biocides regularly applied to it by the previous owner--grass that was habitually mown and the clippings removed off-site.  (Ie, organic material removed over and over.)  Spectacularly dead dirt and compacted clay underneath.


Satellite from around 2018.  I didn't know what I was going to do yet, but a permaculture designer was helping me put in a zig-zag ditch that I later abandoned in favor of straight rows for annual beds over the septic reserve field.


Satellite from late fall in 2020.  I think the nearby forest fires were out by this time, and the annual grasses had died and mostly been trampled by me.  Only a few of my major trees were planted--a couple walnuts, some chestnut, a few berry bushes.  12 apple seedlings grew from 40 seeds I had planted.


It looks much different now, but I don't mind waiting until 2022 to see a good photo.  :)  The most recent changes are the 72 bare-root native trees I planted (noble fir, Oregon ash, big leaf maple, Garry oak, chestnut, beaked hazelnut, countless berry shrubs, Indian plum) and small plug plants.  Also, I have yet to do this, but this year I'll be altering the structure of the annual beds... again.

Ooof, this is Google's current image.  I think it's from August 2022.  Everything died, and unlike previous years, there were still brown dead spots into winter.  (Usually, the rains of fall restored greenery everywhere by the first cold snap, but not last year.)


Friday, March 19, 2021

Thoughts on process - Buy sun-loving plants first

I bought 72 bare-root trees and 47 starts at the annual county plant sales.  I'm killing myself getting everything in the ground.

As I was struggling to find shady spots in my bare, open acre, for those plants that wanted shade, it occurred to me yesterday, shit, I should've bought only sun-lovers.  Then in a few years when they were big enough to provide shade, buy the shade-lovers to fill in spots.

Wish I'd thought of that earlier.  I couldn't say no to wild ginger, bunchberry, etc, though.


Update 7/1/2023:  

Nope.  Now that I have had another 2 years to tinker and learn, I would say that first, before buying any plants, that you at least have established cuttings of pioneer plants all over the place to provide shade to whatever new plants you buy and put in the ground.  If you pick pioneer plants that also fix nitrogen in the soil, and/or form relationships with mycorrhizal fungi, then that's even better.  Pioneer plants are free (they're all over the place), and root easily from cuttings (except for alder, which frankly, would be the ideal nurse plant since it meets all of the extra criteria).

Actually, if I were to list ALL of the tasks that I would do in the future, to go from bare land to food forest, I think this is the order I'd go in:

1. Observe how water moves through the ground on your property for 1 whole year.  Mark wet spots on a satellite image of your property.  Mark arrows moving away from the driest spots to the wettest spots, downhill.  Then, mark on the map where you might eventually put swales, ponds, bridges, rainwater collectors, hugel beds, etc, in order to distribute water better and make it percolate into the ground better.  Soil is the best water reservoir.

2. Make a loose plan.  Loose!  Mark where things like septic systems and underground utilities are.  Mark where you want your annual crops, living hedges, orchards and alleyways for any grazing animals, food forests, etc.  You might have to redraw boundary lines later, and that's fine.  You might have to switch areas later if you end up accidentally creating a swampy area, and that's fine--just plant water-loving plants that you can graft other things onto (like crabapple and dogwood).  Or dig down for a pond and bring in pigs temporarily to gley it in the French way.  Or make a stepped pond where, as the water aborbs into the ground, it exposes moist, flat sections of shore that you can plant annuals into.  My point is, don't emotionally invest in your perfect plan, because nature will throw you curveballs.  Also, as you work the land, new ideas will come to you.  I turned my woodchips processing area into 3 level parking spots, and I'm going to plant shade trees around it to shade the cars.  The woodchips will process faster since they'll keep getting agitated by the cars.  There's no way I could've predicted that idea when I made my first loose plan.  Also, everywhere I'm putting in terraces, I'm alternated each planted terrace with a walking path terrace so that I can easily access the planted terrace and knee height.  I couldn't have come up with that before I accidentally created it and went, "hey!"

3. Now that you know where you might want to move water to, and where important stuff is, mark where you want drivable paths, or tractor-wide paths.  Include storage locations for things like wood chips, and make sure it's easy for a truck to dump there.  

4. Before you do anything else, put your driveable paths in!!  I would've saved 90% of the time and effort and damage to my body if I could've driven loads of stuff to various locations around our sloped acre.  :(  You might need to splurge on packed gravel road.  In a pinch, you can build paths over time with successive loads of woodchips from ChipDrop.  I cannot stress how important this step is.  You can redirect water, you can change where you store stuff.  You cannot make up for the lost time caused by having to move tonnes of material manually with a wheel barrow over uneven ground, up and down hill.

5. Dig your swales, from the highest elevation to the lowest, and watch what happens after some of your heaviest rains.  (You might have to tweak a bit after the first, startling rainfall.)

6. Lay down foot paths everywhere.  I can't tell you how annoying it is that I have several plantings that are difficult to reach on foot because there are too many things around them that I don't want to step on.  Put down weed barrier and cover in wood chips or straw.  Whatever you have to do.

7. Now that you have reliable (or at least improved) water management, and paths, you can start putting cuttings in the ground (preferably in spring or fall) of nurse plants.  These are things that grow like weeds, which will provide shade and hopefully nitrogen fixation to the longer-term plants that you care about.  Or, they'll provide mulch that you can chop and drop.  In Syntropic Agriculture, they use cassava stakes, planted at an angle such that the leaves will give shade to something, and the roots won't compete with the roots of that something.  They call the cassava the "placenta".  They plant it around fruit and nut saplings.  You can often find lists of "nurse plants", "mulch plants", and "nitrogen-fixers" in Permaculture books or websites.  Don't pick plants you won't be willing to severely prune.

8. Speaking of fruit and nut trees, you can plant small ones within the protective rings of whatever placenta plants you choose.  This is also a good time to plant actual nuts and fruit seeds.  If you're planting near buildings, I highly recommend using seeds/nuts, because trees that grow from seeds create the deepest tap roots and are far less likely to blow over in a storm.  

9. Cover all bare areas with cardboard, mulch, wood chips, straw, weed barrier, sileage tarp, or whatever you can get your hands on.  Preferably organic matter mulch.  If it's bare soil, broadcast lots of living mulch seeds like clover, buckwheat, etc.  If it's compacted soil, sow diakon radish or turnips.  Cover seeds with plastic that's white on the top side, and leave it for a week or until the seeds have time to germinate and take hold.  That way, birds won't get at your seed.

10. Bonus task: if it's logistically and financially feasible, it would be good to start regular waterings of aerobic compost tea, and/or TeraGanix EM-1, and/or mycorrhizal fungi, and/or spread fungal-inoculated wood chips everywhere, soaked and protected by an extra layer of organic matter.  The faster you increase the population of beneficial microbes, the healthier your plants will be, and the more they will resist disease and pest insects.  They'll also heal faster from insect damage.  Plus, the more microbes, the faster your unsightly mulch will be broken down.  Do these waterings in spring and fall, at least 10 days apart, and as many as you can afford.  Make sure the microbes have a layer of protection on the soil surface.

11. At this point, you have nurse/mulch plants, and they're protecting the trees that will take the longest to come into maturity.  Now you can safely rest for a season or two, and watch the results to see if you have to tweak anything in your design or tweak your plant choices.  If something dies where you put it, then that wasn't the best spot for that plant.  Try a different plant.  Let weeds come up and research them.  Are they useful to you?  I had 15 medicinal plants growing for free, and 20 food plants.  Cleavers made me feel amazing when I put them in green smoothies.  Dandelion made my back feel better because I guess my pain was liver-related.   I ate pickled dandelion roots--yum!!  Prickly lettuce became my favorite painkiller for muscle aches.  Whatever bitter herb I could eat raw I put into smoothies with enough sweetening (fruit or whatever) to overpower their taste.  Others I'd put in salads.  If I had to heat a plant to denature things like oxalic acid, I'd saute it or extract it into a medicine.  I swear, I could eat enough greens for free just from the pioneer species that were growing here naturally.

12. Start filling in your bare spots with shrubs, herbs, etc.  Propagate things like crazy, especially the seeds of what you already have, because they'll be more genetically adapted to your environment.  If you can afford it, buy plants from a nursery and put them in the ground in only spring or fall so that they don't go through transplant shock in the heat of summer or the cold of winter.  

Some of these tasks can only be accomplished over time.  I'm 3 years in and I'm still bringing in organic matter.  That's because for 30 years, the previous owner of the house exported valuable organic matter off the property (ie, they mowed, collected the grass clippings, and let the city take the clippings away).  I still have spots that when dry, the soil becomes hard as rock because it's all clay with no organic matter and thus no biological life.  Eventually, I'll have enough mulch plants that I won't have to bring in any outside organic matter--I'll be able to chop-and-drop my way around the property.  After a while, natural leaf-drop in the fall will provide enough organic matter.  Can't wait for that.


The secret to increasing fungal growth in the PNW

It's so wet and humid here.  It's almost impossible to get beneficial fungi growing.

I bought a brick of wood chips innoculated with winecap spawn (King Stropharia).  I put it in a perforated bucket and covered it with moss that came straight out of our lawn.

Then I forgot about it for more than a week.

Looks what's happened!  The fungi seem to like growing into the moss!  Is it using the moss as a food source?!?  No one has said moss will do that.  I would've guessed that moss was a bacterial food.

Is moss the secret to getting beneficial fungi into Pacific Northwest soils?  

People around here fight to kill moss in their garden all the time!  I wonder if that has contributed to the bad fungi winning.

By summer, our moss is all dead, so I need to harvest it and keep it alive somehow.  In fish tanks?  Over more inoculated bricks?

I also need to do this again and take a look at the moss under the microscope before, and several times after, over time.

Update later this day:

I searched the Soil Foodweb School's forums to find out if moss was a fungal or bacterial food.  There was one thread that sounded promising, and in it was a link to scientific papers.  This one suggested that moss is a fungal favorite, but for mycorrhizal fungi.


Update 7/1/2023:

I've been learning from the instructors at Raven's Roots Naturalist School.  They've experienced evidence that we need to make our compost with more water than recommended, because that's what our microbes prefer.  (Maybe that's why the fungi seemed to love the moss.  We have so much of it!)  And, compost seems to produce better results if it goes through an anaerobic phase first.  It's just what has happened here naturally, historically.  Every bioregion is different.  Thank you Gabe and Reisha!!

Tuesday, January 26, 2021

Building garden structures with available wood

 Hoo-boy!  Look what my friends are giving me, if I can get it to my house.


I want to use it to make the retaining walls that I thought I'd have to wait for, to purchase cement blocks for.  I know they'd decompose in 3+ years, but maybe I could do something cheap to preserve them longer.  Like scorch and wipe with boiled linseed oil.

But how can I make a good solid structure?  I used some foam bits and bobs to get ideas.

A major problem is, transporting the wood rounds to our place.  They're flipping heavy!  Like 400 pounds for the biggest pieces.  I have a friend who has a heavy duty trailer, and he says he can transport them in 6 to 8 trips.  He also has a 32" chainsaw to bring the size/weight down, but I want to keep a lot of them whole.  He also says we'd need to rent a trackhoe to get the pieces loaded onto the trailer, and even then, you'd need 3 people to maneuver the pieces into the trackhoe bucket.

Gawd!  Free wood is not free.  I wish I could wait until the pieces dry out, but my friends want them gone before spring.  So, I need to make decisions now, for the cuts.

Hooo!  I'd love to make a fence using the discs, upright.  I wonder if there are enough.  I'd need 300 feet times 2, and 150 feet.

Monday, January 25, 2021

Annual bed design trials

For the area of yellow rectangles in the image below, the slope goes from shallow (on the left) to steep (on the right).  The slope faces east.

I've redesigned those beds 5 times.  

Design Permutations

The first was a zigzag ditch (suggested by a permaculture designer) that was supposed to be for drainage, with little stopgaps and catchment pools on the way down.  When I realized what he was designing and digging, I said, "Wait, it's for water?  We don't get enough drainage here to fill it, even in the rainy season.  I thought you were doing a hugel ditch."

So, we turned it into a hugel ditch and prepared beds above and perennial slopes below, but what a pain.  You can't barrow-in organic material easily when you have a zigzag of raised ground.  

So, I redesigned them as rows that went straight across (north to south), but with a curve, like a bow.  I decided that would help catch water a little more and let it permeate deep into the soil.  I gave up on the ditches and decided to berm using scrap wood.  Massive pieces of scrap wood.  I'd backfill uphill of the wood to make flat beds.  In essence, terracing the slope using short wood retaining walls.

Then I realized the curve was pointless without swales (yup, the swales that the permaculture guy was essentially creating).  Instead of focusing on water catchment (since I failed so spectacularly), I decided to focus on creating critter habitat, especially for snakes, so I thought laying the wood like a sine wave would create more "edge effect".  What a pain to mow, though.  And I tripped a lot.

Then I realized I should space the rows differently and have paths through the 100 feet of wood and backfill.  This meant that all the wood had to move again.  I also made the rows straight instead of wavy.  :(  What design permutation are we on?  Yeah, 5.  

Problem


I grew crops in the rows after that 5th design.  Sadly, the super-wide beds were painful to plant in.  My body is old.  I only want to have to reach 1.5 feet or less.  


Retaining wood higher than the soil level because I ran out of time to backfill.

Also, I hadn't had time to backfill to the point where the soil was level with the tops of the wood for the rows that were lower down on the slope (the deeper rows).  And guess what I learned?  The greater the difference in height between the wood and the soil, the colder the bed was in spring.  In fact, there was a 2+ week difference between when the soil in the top-most row (closest to the house) reached and maintained 60 degrees F and when the soil in the lowest row reached 60.  Why?

Every morning, chilly, humid air flowed down from the top and got caught and held by the exposed wood.  Even if the uphill side of the bed had been raised, it probably still might've been a problem.  We also have cold morning fog that moves up from the valley.  I live in zone 8b, but the top most beds were more like zone 8a and the bottom was more like zone 7a.

What to do?  I mean, coldframes, sure, but that's quite an expense.

New Idea

So now I'm toying with the idea of square raised beds, where the soil area is the size of a standard scrap square window or 2 rectangular windows (in case I do want to use cold frames).  However, I want the squares to be rotated a quarter turn so that any cold air moving up or down the slope hits a point and flows around the raised bed.  It has the added benefit of splitting and redirecting the super cold winter winds that blow north and south.

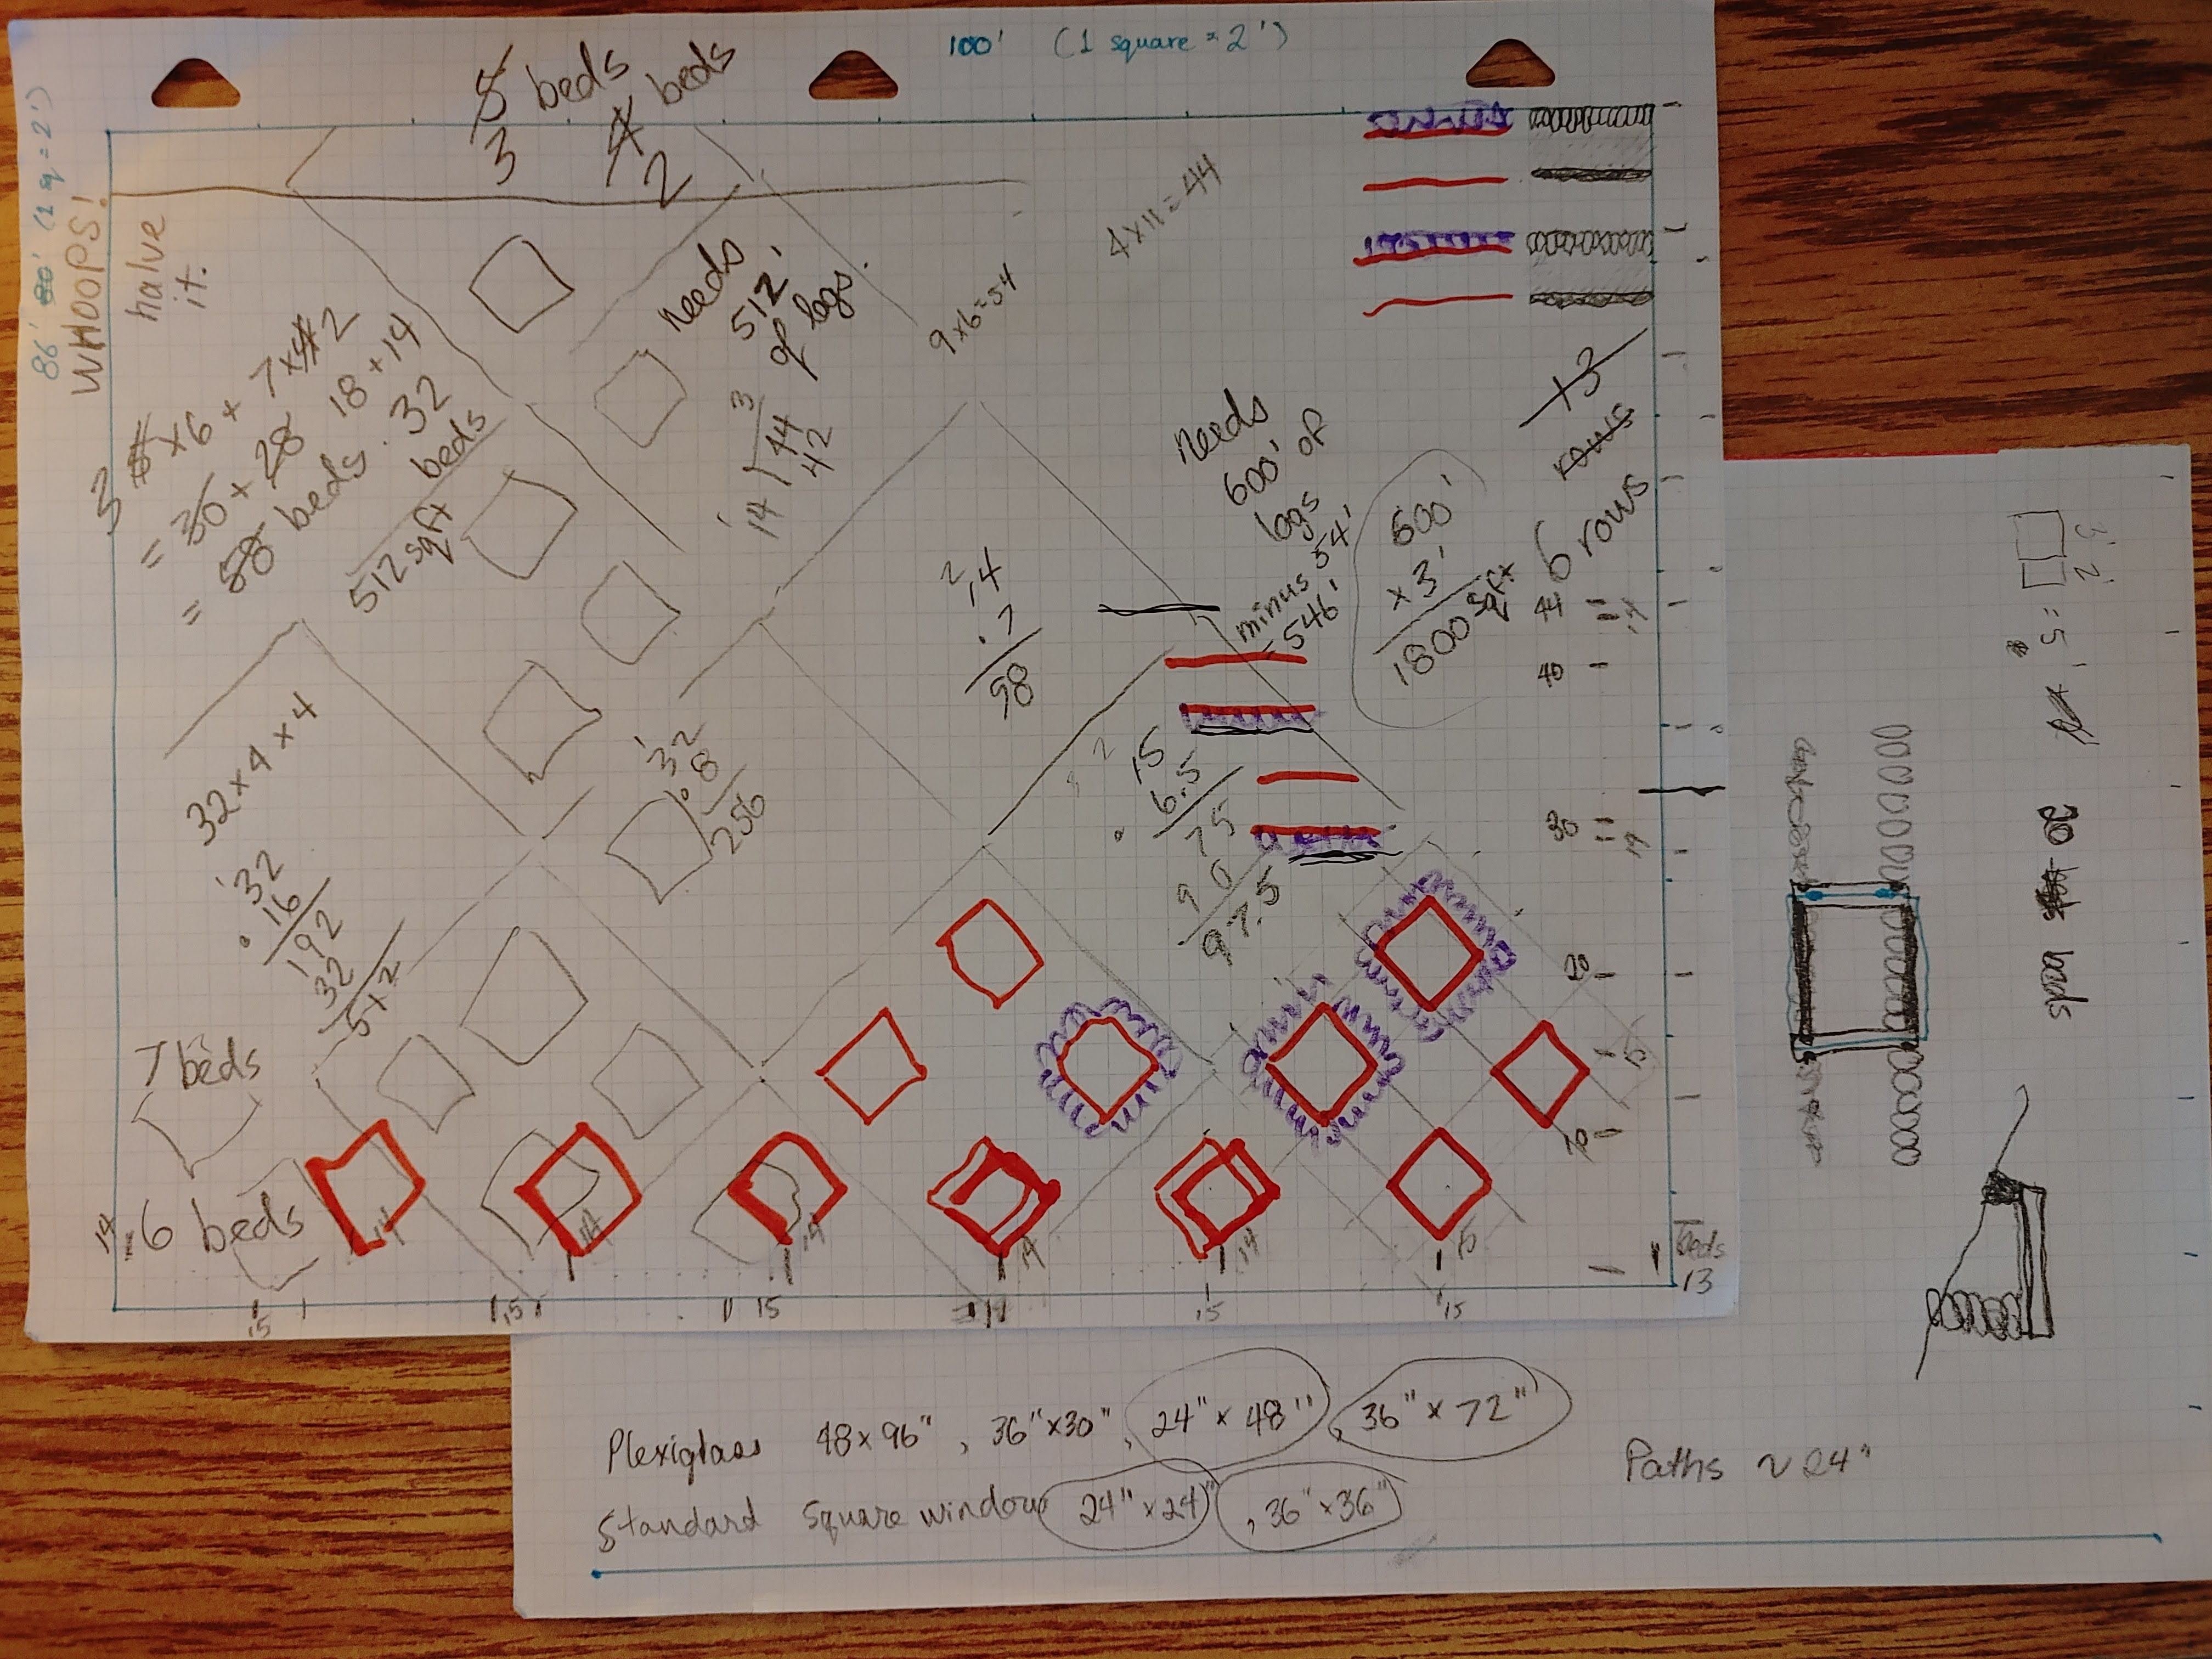
I did some calculations to compare new straight across rows of raised beds (designed 3 feet wide in order to fit scrap windows or plexiglass from Home Depot and be comfortable to reach across), with quarter-turned square beds (4 feet by 4 feet, otherwise I'd have to make a gazillion beds).

I mistakenly started with a space 100 feet by 88 feet, but I only have 100 feet by 44 feet.

Rows:

- 6 rows, 100 feet long, minus about 54 feet where paths are put through, times 3 feet wide = 1600 sqft of growing surface.
- Requires 546 feet of wood retaining walls, plus ~72 feet of wood to flank the paths = 618 feet of wood retaining walls.
- Ratio of growing surface area per foot of assembled wood walls = 2.6.

Diamond beds:

- 32 beds, 4 feet by 4 feet = 512 sqft of growing surface.
- Requires, say, 5.5 feet of wood on each of the 4 sides of the beds, times 32 beds = 704 feet of wood retaining walls.
- Ratio of growing surface area per foot of assembled wood walls = 0.72.  Yikes.

I suppose I could do a chevron design in order to make better use of the space and more efficient use of the wood, but then water would drain too fast, and it would be too hard to get organic material in.  Maybe.  Maybe I'm wrong.  Actually, the more I think about this chevron design, the more I like it, but now I realize that because of the slope, I wouldn't be able to have flat bed unless the bottoms of the chevron rows were 4 feet tall.  :)

Are there other benefits to the square beds and less growing surface area? 

OK, so the row idea is more efficient and will take less time to construct, but are there other reasons that make the diamond beds a better choice?  Like...
- Higher percentage of woody material, and thus might attract more fungi.
- Easier traversal with a wheel barrow to dump organic matter.
- Can comfortably reach into the center from all sides.
- Plants, as they grow, often spread outwards, covering soil anyway, and I can let that happen into the paths instead of letting it take up valuable growing surface area.
- Would it be better for snakes or worse?  As long as there's foliage or wood chips in the paths to hide them from birds as they cross from one bed to the next, it should be ok.

Anyhoo, I'm on the fence.  I should do a combination to test things out, but I'm feeling too rushed.  Wahh!!!


Update 2/5/2021:

Cons for the square/diamond beds

- Because of the 18" of wood framing the beds, I'd have to make the beds about 6' x 6', which means a reach of 3 feet to the center.  I don't even want to reach 2 feet.  This is a big enough con for me to throw away the square/diamond bed idea.

I'm back to the chevrons (broken into lengths that allow for making the soil level), and regular rows.  Need more think time. ...


Update 7/17/2023:
Straight lines for the win

I can't even.  I'm on design permutation, what 7?  I have learned A LOT.  But my body's broken.  

I'm going to make terraces on contour such that there are 4 levels.  The surface of each level will be... level.  That way, I can use cloches (cold frames) if I need to, not only for weather problems, but also to keep slugs off of some things.  Each level will have 2 or 3 planting rows, where the paths in between will be swales backfilled with rocks and wood chips.

I've already been trying to level out the places where a terrace on contour will create a wavy line.  I just need the logs.  For now, I'm not letting it stop me plant.  Just harvested a potato dinner for 5 today--gorgeous, big, worm-free potatoes!  Something at 2 from the same plant, but left the 4 that I grabbed untouched.  Hurray for weekly dumps of beer mash, hops paste, and wood chips!  

My instructors at Raven's Roots Naturalist Farm prefer to make their planting rows and paths each 2 shovel-widths wide.  I'm going to start with that and adjust as needed.

Friday, January 22, 2021

Perennial, short-growing, cover crop (aka living mulch)

I had a goal on my list today to choose, and order, seeds that I could sow into existing grass/weeds when the weather dries up (after a sudden drop in temp, probably late January or early Feb).  When that happens, the soil should shrink, retract, crack, and allow seeds to get in when broadcast and raked in.

Best laid plans, right?

The criteria for the seeds was:
  • Short-growing, preferably 4" or less.  If taller, as long as I don't mind mowing them, that's fine.  In fact, it'll produce nice mulch.  But it means I don't want stuff that's medicinal, or delicate, that grows tall.
  • Perennial or self-seeding.
  • Native, preferably.  
I want to get up to 12 species, because restoration agriculturalists around the world are discovering that that's the magic number where diversity breeds insane fertility in the soil.

So, I started shopping online.  

The following things started challenging my goal (aka, what went wrong):
  • I started wanting stuff that couldn't take foot traffic (or truck traffic).  Good King Henry snuck onto my list.  Then alpine strawberries.  I want to seed the drivable path (or at least, the edges), and with any leftover seed, the edges of my zones.  
    • So, I have to restrict myself to stuff I don't mind getting damaged.
  • I looked in Gaia's Garden for a list, but the list prioritizes things that are good for permaculture design and thus not restricted to native plants.  
  • I tried shopping for the natives on my list, but it's impossible to get more than a few, because most natives that meet my criteria are considered weeds, or too precious for foot traffic, or perennial and thus seed companies don't want to advertise them.
    • So, I had to scale back my goal, and do what I can do now, and call it phase 1.
I keep forgetting that making changes in nature is SLOW!  So, I don't have to feel like I have to accomplish an end goal within one massive effort.  I've got seasons and seasons at my disposal, making it possible to sculp my land into the perfect, native woodsy, wonderland.

Phase 1: Winter 2020/2021 I'm going to get the seeds that I can get, and sow those.  I'll avoid where truck tires will actually go.
Phase 2: Fall 2021 I'm going to go hiking and collect seed from native plants.
Phase 3: Keep buying what I can, using Plant Search Result (pfaf.org) to select good plants, and start sowing the collected seed.

Here's the list I came up with, and the bolded ones were the only ones I could buy (from Restoration Seeds and Territorial Seeds):
  • Miner's lettuce (have 2 patches).
  • Etamps / Lamb's lettuce / Mache (have 1 patch).
  • White clover, of course.
  • Sheep sorrel.
  • Creeping wood sorrel.
  • Bear grass.
  • Plantain (already have, broadleaf and narrow).
  • Cleavers (already have).
  • Catnip.
  • Salad rocket.
  • Chickweed.
  • Common orache.
  • Ground ivy.
  • Knotweed.
  • Lamb's quarters.
  • Peppergrass.
  • Cudweed (not really native to this area, but I love the taste).
  • Pigweed.
  • Pineapple weed.
  • Wild bergamot.
  • Stork's bill.
  • Quickweed.
  • Purslane.
  • Lamb's ear (have 1 patch).
  • Sweet gale.
  • Garden cress.
  • Blanketflower.
Look at how well Miner's lettuce does as a living mulch!
Mache (lamb's lettuce) isn't bad either, but struggles with buttercup.  Maybe if I frequently watered with mycorrhizal fungi, these would outcompete the buttercup...

Sunday, November 29, 2020

Journal of today's work in the garden -- Nov. 29th, 2020

Yesterday I had endless energy, off of two servings of my protein powder (breakfast and lunch).  Yeah, I had a massive supper full of sugar and wheat, but I didn't feel the effects until early in the morning (had a bad sleep, then kept waking up every 30-60 minutes after about 4am).

Today, I decided to try bulletproof coffee, on an empty stomach.  Wow.  I've had an acidic, scraped feeling in my whole abdomen all day.  I had a massive late meal (3pm), and I tried to garden after that, but I was breathless and couldn't make it pushing the wheel barrow up the hill without stopping multiple times.  WTF?  I can't believe the difference.

Anyhoo, here's todays work.  Not gonna bother with the extra steps of getting the larger pictures in place.


Saturday, November 28, 2020

Journal of today's work in the garden -- Nov. 28th, 2020

I decided I needed to take pics when something cool occurs to me or something I want to remember, and then caption it, and post to Instagram.

I didn't realize that your "story" photos are portrait shaped, and your "post" photos will be square.  I have a lot to learn about posting to Instagram.  

Anyway, here they are with better explanations.

OMG, the resolution is terrible!  Hmm.  Would've been better to take the shots using the phone's camera, try and caption it, and then upload later.

Lasagna layers (coffee grounds, sticks, green leaves, wood chips) and wind protection (the tree stump) around the mandarin orange "tree".  :)


I left the hose, which snakes its way throughout the compost pit, on overnight about 2 months ago.  Maybe 3.  This patch of lawn downhill from the pit has been soggy ever since.  This tells me there's good water holding capacity on the surface, and the surface layer is deeper than it was.  However, there's still compacted clay underneath.


I put another lasagna ring around this tiny hazelnut sapling.  It's in a cage because the rabbits kept eating it down to the ground.  Lasagna rings--what a great way to identify plants that you want to protect from any future digging/working in the garden, or that you want to check on next spring.  Also, if all of the rings look the same, it'll be tidy and pretty, which makes for happy neighbors.


I found a bucket that was filled with a couple busted garbage bags of Starbucks used coffee grounds, and a lot of rain water.  The smell was gross, like a porta potty.  That tells me there are anaerobic microbes in there.  Not sure if they're good or bad.  They didn't smell like those chemicals that Dr. Elaine Ingham tells you to scent for.  I'm gonna look at the red liquid under the microscope tomorrow to see what's in there.


I spread out the coffee ground sludge and mixed it with dry woody material.  I'll look at samples under the microscope every day for a few days to see how long it takes for the anaerobes to encyst and the good guys to come back.


This sprouts around the established parent tree (ornamental crabapple) need to be tidied up.  I won't cut them down to the soil, though.  I know we have rodents who like to nibble bark.  I'm going to see if, by leaving about 3" of each of these sprouts, if they rodents decide to chew on the younger bark instead of the tree's bark.


My far-away neighbor collects 7-9 buckets of horse manure for me every week.  I used to put it on my compost pit, but that was excessively laborious, because I strove to keep the ratio of nitrogen | green | brown material correct, so that meant hauling wood chips on top of the manure and finding leaves, etc.  I'm gonna call my manure pile (nay, windrow) done for the year, and start hauling the buckets across the ditch into the yard to start lasagna layering in place.  I intended to haul the finished compost down here, but who wants that extra labor.  Why not compost in place.  Then I have built-in green material (the plants I'm covering).  I cut out the second haulage event.  I won't kill weed seeds, but the worms will kill any pathogens if I leave it long enough.  I'll layer first in the spots where I want to grow food next year so that it'll have the longest time to age before planting.  Then I'll start piling the manure in the fedge areas, since I won't be planting that for a year or more.


OMG, there's an acre to cover.  WHY OH WHY didn't I compost in place before now?  Oh right.  I felt like I had to have the driveable paths done with gravel so that I could truck stuff in.  MAN, how the bucket method makes things so much easier.


Can't really tell how big my compost windrow is now.  It's 5 feet tall.  It's 10-20 feet wide.  And it's longer than 2 trucks end-to-end.  I cannot possibly turn it myself.  It was an experiment that I learned a LOT from.  You can't have a compost routine where you have inputs arrive every week.  At least, not without heavy machinery.  I need to make a few static piles, properly made, 40 buckets each (5-gal buckets, not the massive ones above).  And I need to do the temperature monitoring and turning as per Dr. Ingham's instructions.  This massive pile... well, it was soggy and anaerobic, at least where the wood logs touch the compost.  I found nasty fungi.  I need to sample things under the microscope, though, to be sure.  I'll do that tomorrow.  As for the windrow, it's time to start moving it into my market garden (annual veg) beds after I finish the terracing.


At least something likes the compost pit.  :)  The strawberries, which were almost dead when I planted them here, are now thriving in the top 6 inches of compost, which is probably totally aerated.


Here are some photos from a few days ago, before I decided it would be good to caption and post them on Instagram right when I took them.


Look at how the potatoes became exposed over time.  Bah!  I understand the hilling-up thing now.  Look at that great, short, groundcover, though!  It's miner's lettuce.  I have a patch that's solidly covered with it.  I planted a few of the good potatoes in it, so hopefully they'll come up next spring.  They were already sprouting, unfortunately.


Here are pics from my massive compost windrow:

Here's what I found under the top row of logs.  You're looking at the top surface of a log that's in the bottom row.


Same view, zoomed out.  Rodent hole visible.  Damn them.


Close-up of the top surface of the log.  Look at that red blood drop.  I can't remember what fungi that is.  The smell was not good, and the compost behind the removed log was sodden.  :(  Oh well.  Live and learn.


Thursday, November 26, 2020

Final redesign of terraces (and any other borders and retaining walls)

I think I'm missing a blog post.  I feel like I wrote this already.  Oh well.

I'm going to redo the retaining walls of the terraces yet again.  This time, I'm going to use this method with the wood, because of the following reasons:

  • You can easily replace pieces over time.
  • You can make things look more tidy, by having the tops all level.
  • Logs are still a free resource.
  • The spaces between don't prevent drainage and they provide habitat.
The downside is, rodents and slugs.  However, I want a rodent population to bring back the rat snake population.  Also, slugs should be taken care of when I finally get the soil microbiome healthy (theoretically).


Maybe I can fix the slug issue by growing something on top like this:


As for the size of the rows, I now know I want more rows of narrower width, because I don't like having to reach so far, and most of the soil ends up being covered by vines anyway so why not let the vines cover pathways.

As for the layout, I need to do some research on water management techniques of indigenous peoples and in permaculture practices.  I doubt I'd have much water to redirect, at least on the surface.  The bigger problem is infiltration, so I'll focus on that.  Some interesting experiments are coming out of India in that regard.


Oh!  And on the uphill side of the rows, I'll hem in with a narrow width of wood chips.  I tested that out last year, and it was excellent!  You can shape any retaining border that you want!

I do need to consider how to handle trellises and cold frames, though.  I'm sure I can just sit the frames on soil on top of the logs, and on the wood chips on the other side.  I've gotta make cold frames with built-in holders for the trellises and removable glass tops.

Time to get out my chainsaw!  :)


Tuesday, October 13, 2020

Today's shots, plus, I'm stalled

After raining about 1/3 of the days since the last pic.

I'm stalled.  I don't know what to do.  My body hurts too much to do the hard labor anymore.  But I don't want to spend $800 renting a backhoe for a week.  We have other expenses due that benefit the whole family.  

I know that the driveable path and soil fertility needs to be top priority rigjt now.  My plants suffered due to a shitty, bacteria-only foodweb.  I'm having trouble making compost with a good foodweb, and my soil in imundated with oomycetes, including some that exude a residue that makes soil particles hydrophobic.  The temps are getting colder, so... do I bother with predatiry nematodes right now or wait?  BAH!!!